Creating subscriptions
For subscribing to a service using Tray, you need to make a call to Create Subscription.
It needs the following in the request body:
-
name: Name of the subscription, you can present this in the UI -
externalId: UniqueId of the subscription that will be stored in your DB and can be used to query subscriptions once created -
trigger
nameandversion: The trigger for which you are creating a subscription. This is obtained from Get Triggers -
authenticationId: The authentication id returned from Create Authentication -
operation: A trigger can have several operations. This is obtained from Get Trigger Operations -
input: A JSON object that follows the input schema of the operation returned by Get Trigger Operations -
endpoint: The URL where you want to receive payloads from Tray (Tray in turn receives payload from the third party service and will forward it to this URL after formatting it to match the Output Schema of the operation).
Step by step walkthrough
For the purpose of this walkthrough, you will need a Typeform account.
warning
To keep it simple, We will also make use of a Tray workflow to receive the payloads from the subscription.
Please note this is NOT how you should be using the Trigger API.
Processing of events should happen outside Tray within your own infrastructure. If you wish to process events within Tray, you can just use Tray Embedded for it and it won't have added latency of delivering events outside Tray.
Once the subscription is set up, we will receive a payload at your target endpoint whenever the Typeform form is submitted.
info
You should fork our postman collection to quickly set up the API endpoints for testing.
Prerequisites
Typeform account
Here are steps to set up your first form:
- Signup/login to Typeform.
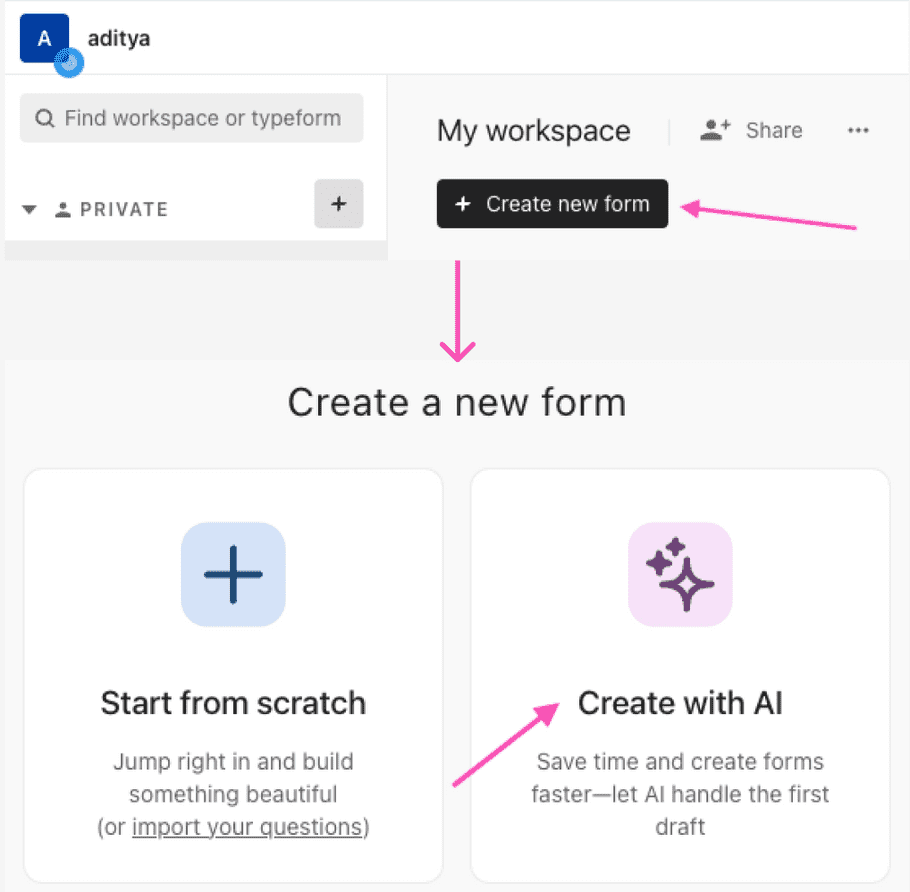
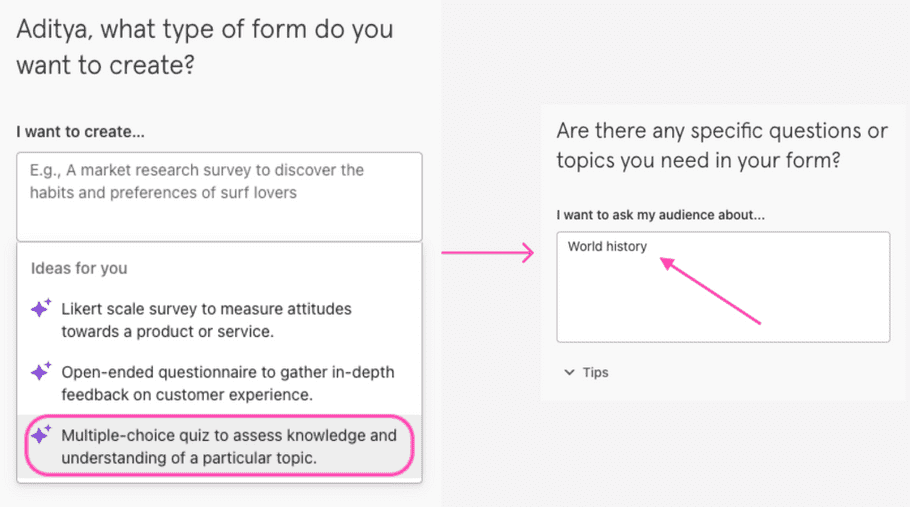
- Create a new form. You can use their AI to rapidly create one trivia quiz form.


Copy the form ID from the URL of the newly generated form. This will be used to Create the subscription.
For example in the below URL:
https://admin.typeform.com/form/D9B26k6g/create?typeform-source=admin.typeform.com&block=5903a939-ab99-432f-955f-69e0d2d89d68
Form ID is D9B26k6g
Create test user
You will first have to create a user for whom we are creating the subscription.
Make a call to create new user
You will need a master_token to make this call.
curl --location 'https://tray.io/graphql' \
--header 'Authorization: Bearer master_token' \
--header 'Content-Type: application/json' \
--data '{"query":"mutation($externalUserId: String!, $name: String!) {\n createExternalUser(input: { \n name: $name, \n externalUserId: $externalUserId \n }) {\n userId\n }\n}","variables":{"name":"myCustomersName","externalUserId":"my-apps-internal-user-id"}}''var myHeaders = new Headers();
myHeaders.append("Authorization", "Bearer master_token");
myHeaders.append("Content-Type", "application/json");
var graphql = JSON.stringify({
query:
"mutation($externalUserId: String!, $name: String!) {\n createExternalUser(input: { \n name: $name, \n externalUserId: $externalUserId \n }) {\n userId\n }\n}",
variables: {
name: "myCustomersName",
externalUserId: "my-apps-internal-user-id",
},
});
var requestOptions = {
method: "POST",
headers: myHeaders,
body: graphql,
redirect: "follow",
};
fetch("https://tray.io/graphql", requestOptions)
.then((response) => response.text())
.then((result) => console.log(result))
.catch((error) => console.log("error", error));Create user token
Copy the userId from the response of last call and use it to make a call to create user token.
You will need a master_token to make this call.
Copy the token as this will be used in the follow up steps.
curl 'https://tray.io/graphql' \
--header 'Authorization: Bearer master_token' \
--header 'Content-Type: application/json' \
--data '{"query":"mutation ($userId: ID!) {\n authorize(input: {\n userId: $userId\n }) {\n accessToken\n }\n}","variables":{"userId":"d869ec65-XXXX-XXXX-XXXX-ac5c1a3958b6"}}'var myHeaders = new Headers();
myHeaders.append("Authorization", "Bearer master_token");
myHeaders.append("Content-Type", "application/json");
var graphql = JSON.stringify({
query:
"mutation ($userId: ID!) {\n authorize(input: {\n userId: $userId\n }) {\n accessToken\n }\n}",
variables: { userId: "d869ec65-XXXX-XXXX-XXXX-ac5c1a3958b6" },
});
var requestOptions = {
method: "POST",
headers: myHeaders,
body: graphql,
redirect: "follow",
};
fetch("https://tray.io/graphql", requestOptions)
.then((response) => response.text())
.then((result) => console.log(result))
.catch((error) => console.log("error", error));Trigger API calls
You are now ready to use Trigger API calls to create a subscription for the end user.
You will need the user_token you obtained in the last step to perform all the subsequent calls.
Get Triggers
Make an API call to GET /triggers using user_token.
info
This call can also be made using the master_token.
curl --location 'https://api.tray.io/core/v1/triggers' \
--header 'Authorization: Bearer user_token'var myHeaders = new Headers();
myHeaders.append("Authorization", "Bearer user_token");
var requestOptions = {
method: "GET",
headers: myHeaders,
redirect: "follow",
};
fetch("https://api.tray.io/core/v1/triggers", requestOptions)
.then((response) => response.text())
.then((result) => console.log(result))
.catch((error) => console.log("error", error));Now copy the name and version for typeform-trigger from the response.
These will be required to obtain trigger operations and creating subscription.
Get Trigger operations
Use the name and version from response of previous request and make an API call to GET /trigger operations using user_token.
info
This call can also be made using the master_token.
curl --location 'https://api.tray.io/core/v1/triggers/:trigger-name/versions/:trigger-version/operations' \
--header 'Authorization: Bearer user_token'var myHeaders = new Headers();
myHeaders.append("Authorization", "Bearer user_token");
var requestOptions = {
method: "GET",
headers: myHeaders,
redirect: "follow",
};
fetch(
"https://api.tray.io/core/v1/triggers/:trigger-name/versions/:trigger-version/operations",
requestOptions
)
.then((response) => response.text())
.then((result) => console.log(result))
.catch((error) => console.log("error", error));The response will be an array of operations.
For Typeform, there's only one operation with name webhook.
Inspect the inputSchema for this operation. This will be used to create the input object for the next call.
Create Subscription
For creating a subscription successfully, we would need to send the following payload to POST /create subscription
{
  "name": "test-typeform-subscription",
  "trigger": {
    "name": "typeform-trigger",
    "version": "4.1"
  },
  "operation": "webhook",
  "authenticationId": "<Typerform_Auth_Id_for_End_User>",
  "input": {
    "form_id": "<Form_id_obtained_from_typeform_UI>"
  },
  "endpoint": "<URL_to_receive_events_on>"
}
To get authenticationId, you should create a Typeform authentication for your user in Tray by following the guide on Creating new auths
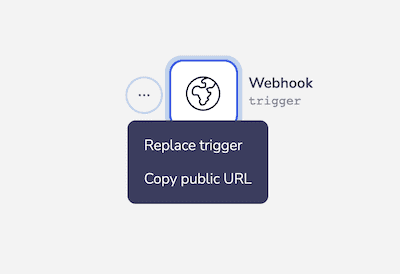
For endpoint, You could use a Tray webhook URL where you will receive events from Typeform.
For this simply create a new Tray workflow with a webhook trigger and copy the public URL.

info
You can also set up a ngrok tunnel to a port on your machine and receive events on a local server for testing.
Here's a code sample with a test request:
curl 'https://api.tray.io/core/v1/subscriptions' \
--header 'Content-Type: application/json' \
--header 'Authorization: Bearer user_token' \
--data '{
	"name": "test-typeform-subscription",
	"trigger": {
		"name": "typeform-trigger",
		"version": "4.1"
	},
	"operation": "webhook",
	"authenticationId": "1a7f8a5b-xxxx-xxxx-xxxx-xxxx76d521ab",
	"input": {
		"form_id": "D9xxxx6g"
	},
	"endpoint": "https://9e2cf626-xxxx-xxxx-xxxx-xxxx33200b41.trayapp.io"
}'var myHeaders = new Headers();
myHeaders.append("Content-Type", "application/json");
myHeaders.append("Authorization", "Bearer user_token");
var raw = JSON.stringify({
name: "test-typeform-subscription",
trigger: {
name: "typeform-trigger",
version: "4.1",
},
operation: "webhook",
authenticationId: "1a7f8a5b-xxxx-xxxx-xxxx-xxxx76d521ab",
input: {
form_id: "D9xxxx6g",
},
endpoint: "https://9e2cf626-xxxx-xxxx-xxxx-xxxx33200b41.trayapp.io",
});
var requestOptions = {
method: "POST",
headers: myHeaders,
body: raw,
redirect: "follow",
};
fetch("https://api.tray.io/core/v1/subscriptions", requestOptions)
.then((response) => response.text())
.then((result) => console.log(result))
.catch((error) => console.log("error", error));This will give you a response with the subscriptionId (id in the response):
{
  "id": "78f05417-xxxx-xxxx-xxxx-xxxx5762d390",
  "name": "test-typeform-subscription",
  "trigger": {
    "name": "typeform-trigger",
    "version": "4.1"
  },
  "operation": "webhook",
  "authenticationId": "1a7f8a5b-xxxx-xxxx-xxxx-xxxx76d521ab",
  "endpoint": "https://9e2cf626-xxxx-xxxx-xxxx-xxxx33200b41.trayapp.io",
  "input": {
    "form_id": {
      "type": "string",
      "value": "D9xxxx6g"
    },
    "public_url": {
      "type": "string",
      "value": "{$.env.public_url}"
    }
  },
  "state": "active",
  "signingKey": "jNEOJkfBNxCOGAHUUZZLqiEAbLbAd8SWr1kh0NHruJk9CIoy1+fv0+b89uGkEM7J52wMYObs/U1J59WFX3E2Kw=="
}
Copy the id from the response as this will be used for deleting the subscription after successful testing.
Test subscription
You can fill the form using the public shareable URL of the Typeform you created at the start.

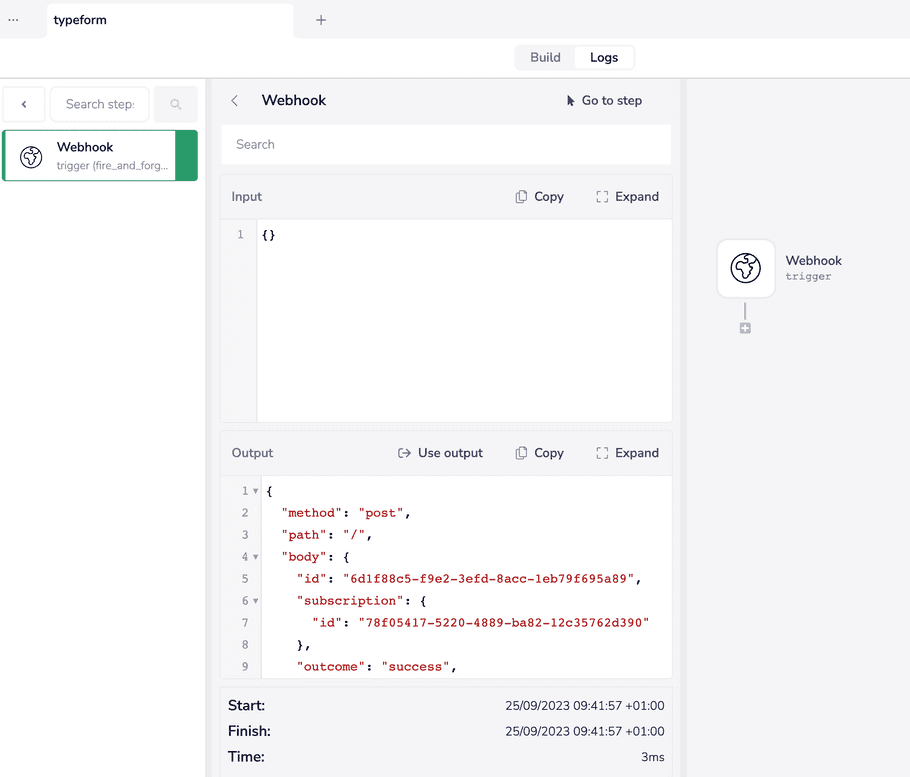
Once you submit the form, go back to the Tray workflow where added the webhook trigger.
You should see a successful workflow run.

The payload from Typeform is the body of the Webhook trigger output. This payload will follow the outputSchema structure that was returned in GET /trigger operations
Delete subscription
Since the subscription you created is still active, it will keep receiving payloads from Typeform at the webhook URL.
You can delete the subscription now by calling the Delete subscripton endpoint.
curl --request DELETE 'https://api.tray.io/core/v1/subscriptions/:subscriptionId' \
--header 'Authorization: Bearer user_token' \
--data ''curl --request DELETE 'https://api.tray.io/core/v1/subscriptions/:subscriptionId' \
--header 'Authorization: Bearer user_token' \
--data ''The subscription should be deleted successfully with 204 no content.